This is one of the few charcoal drawings which I drew directly from a photograph.
In the few cases where I've done this, I give credit to the photographer. (The photographer here was American jazz photographer, William P. Gottlieb.)
Even in these cases, however, I make changes to my charcoal drawings so they are not exactly like the photograph. I make these changes to add my own personal dramatic effects, and to work within the limitations of charcoal.
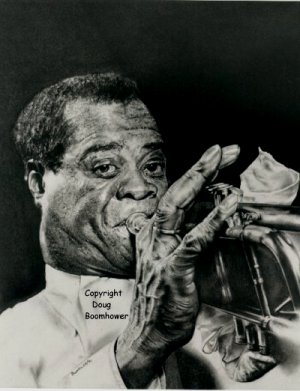
My goal here was to see how far I could push my charcoal drawing techniques to make the textures look real . . . the skin, the handkerchief,the metal trumpet , the shirt , and the hair. Some people have a difficult time drawing from life because they find it hard to translate the three dimensions in real life onto a two-dimensional drawing surface.
Others can easily translate what they see whether they are creating charcoal drawings from a photograph or drawing from a live model.
In either case, you must observe very carefully, and then translate those observations expressively onto the surface of your charcoal drawings.
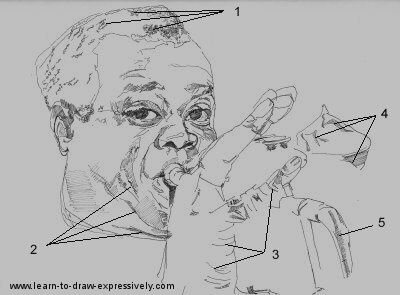
Before applying any charcoal drawing techniques, you should make preliminary drawing pencil sketches.
This one wasdrawn in ink(which is unforgiving since you can’t erase!)
Some of the lines, particularly those in the hand, were done quickly in order to get the feeling of movement. These are called gesture lines. The rest of the lines can all be considered to be contour lines.
Both gesture lines and contour lines simply are lines based on close observation. The difference is, gesture lines are done quickly, contour lines are done slowly.
This first preliminary looks three dimensional because of carefully chosen lines. Referring to the numbers on the preliminary drawing above:
- Contour lines suggest tight curly hair.
- Contour lines suggest facial structure.
- Contour lines suggest hand structure.
- Contour lines suggest texture of his handkerchief.
- Contour lines suggest structure of trumpet.
Then I drew a second preliminary in pencil (below). I did this to further refine things before adding any charcoal drawing techniques.
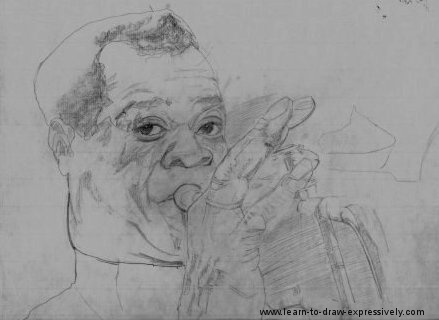
As always, I traced the last preliminary on to my good Meridian paper. (Use a light table to do this if you have one.)At this stage, I had a pencil drawing on a completely white piece of Meridian.
Then the real work began.
In order to bring the drawing alive, I had to address the lighting and the texture over the entire surface. This is all done with charcoal drawing techniques acquired through experience.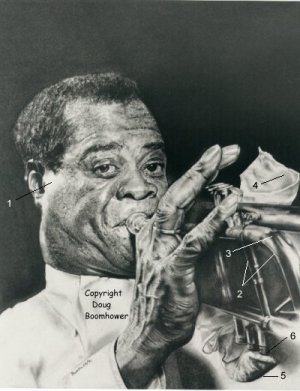 Note the following charcoal drawing techniques:
- The strongest highlight beside the ear; this is the only area with such a strong highlight so it has a lot of impact. For the hair I used a hard (HB) charcoal pencil. I held the pencil with my right hand, and with the forefinger of my other hand on the tip of the pencil, I rolled the lead tip across the surface. By alternating these movements with highlights, I implied tightly curled hair.
- For the metallic look of the trumpet, I use a softer charcoal, (3B pencils and vine charcoal). I soften the shadowed areas on the trumpet with watercolour brushes.
- Around some highlights, I use harder charcoal (HB), for sharp contrast which thereby increases the realism of the highlights.
- To achieve the soft texture of a handkerchief (which “Satchmo” always used) I used only vine charcoal. Highlights on the handkerchief were done with a kneaded eraser.
- Lower part of the handkerchief, which is in shadow, is done with 3B charcoal pencils, HB charcoal pencils, and blending stumps.
- Note the very sharp edges are done here with hard HB charcoal pencils. This clearly delineates the trumpet from the texture of the surrounding handkerchief. Areas like this require clarity to add to the overall impact of the composition.
The black background: When I started the charcoal drawing this area was a pure white piece of paper. It is very important that the black areas be evenly blended . . . otherwise it won’t look real and it will clash with the detail of the foreground figure.How to achieve a black background:
- scrape 5B or 6B pencils with an "Exacto" knife onto the paper.
- Use crumpled toilet tissue to slowly rub the charcoal dust into the paper.
- Repeat applications until the surface is completely and evenly darkened.
- Your last application should be with a harder pencil (2B) to solidify the background.
You can also buy charcoal dust but if you don’t use it often in your charcoal drawings, scraping the pencils works just fine. Just remember, a little bit of charcoal dust goes a very long way.
My next challenge was to extend the black area precisely around the outline of Armstrong’s head, hand, trumpet and handkerchief. I did those areas with a fine soft-bristle brush.
No comments:
Post a Comment